Session
Create a new Session
- Tap '+' in the Sessions list.
Title: Enter the title which you want to use as the name of the Session.
- Password: Entier any password of the Session.
The password of the Session will be shared by all members of the Session. Please don't use the same password which you has already used in other services. Please also avoid turning to use the same password across multiple Sessions. - Tap 'Create'.
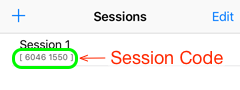 A new session will be created and will be registered in the Sessions list. The assigned Session Code of the new Session will be displayed in the Sessions list.
Join to the existing Session
(The Password and Session Code of the existing session is required.)
 Tap '+' in the Sessions list.
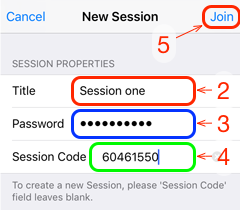
- Title: Enter the title which you want to use as the name of the Session.
- Password: Entier the given Password of the Session.
- Session Code: Entier the given Session Code of the Session.
- Tap 'Join'.
The Session will be registered in the Sessions list.
Member
Display Member Information
 Tap the 'Settings' tab
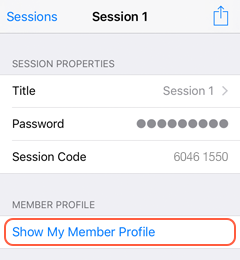 Tap 'Show My Member Profile'
Your member information is selected from the 'Members' list and displayed.
You can also display by tapping the 'Members' tab and directly selecting your Member (light blue background) from the displayed 'Members' list.
Tap 'Show My Member Profile'
Your member information is selected from the 'Members' list and displayed.
You can also display by tapping the 'Members' tab and directly selecting your Member (light blue background) from the displayed 'Members' list.
Name
You can change the member name ot the Session at any time. The new member name will be shared with other members soon.
 Display your 'Member Information'
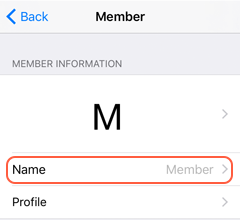
- Tap 'Name'
- Name: Enter the member name which you want to use in this Session
- Tap the back button '(Session name)'
The new member name will be uploaded to iCloud.
Icon
You can change color and character of the icon at any time. The new icon will be shared with other members soon.
 Display your 'Member Information'
- Tap 'Icon'
'Icon' settings view will be displayed. 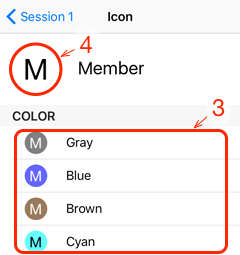 Color: Select the color of the Icon you want.
- Character: In the default, the first character of the member name is used.
- Tap the character of the Icon.
Text field will be available. 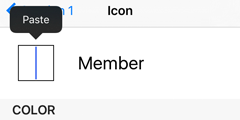 Enter a favorite character. You can also use Emoticons. To paste an image, select 'paste' from the menu.
- Tap outside of the character.
The character will be fixed.
- Tap the character of the Icon.
- Tap the back button '(Session name)'
The new Icon will be uploaded to iCloud
Profile
You can register your profile freely.
- Display your 'Member Information'
- Tap 'Profile'
- Profile: Enter your profile
- Tap the back button '(Member name)'
The new profile will be uploaded to iCloud.
Nickname
The display name of all members, including yourself, can be replaced with your favorite nickname.
The nickname is valid only on the registered device. It will not be shared with other members of this session.
- Display your 'Member Information'
- Tap 'Nickname'
- Nickname: Enter any nickname
- Tap the back button '(Member name)'
A new nickname will be used for display and reading as a member name.
Message
Instant Message
- Enter the message into the field which is on the top of the Messages list or Map tabs.
- Tap 'Send'.
The message will be sent.
Standard Message
- Tap 'Compose' which is on the right top corner of Messages list or Map tabs.
- Enter the message.
- Tap 'Send'.
If you return to the original view without tap the 'Send' button, the message in the input will be done only save, and will not be sent.
Voice Message
Messages can include text as well as voice. The maximum length of voice is 10 seconds.
Start Recording
- Tap the record ('▶︎') button.
Recording will start after guide tone (short triplet tones).If silence continues for a certain period, it will be detected as the end of the message and the recording will stop automatically.
End Recording
- Tap the record (stop '■') button.
Recording will stop and guide tone (short single tone) sounds.If you stop within 1.5 seconds of the start of recording, the recording will be canceled.
Send a Voice Message
- Tap 'Send'.
Play a Voice Message
For messages that contain a voice message, the name of the sender is framed in green and the play ('') button is displayed on the right side.
- Tap play ('').
The voice message will be played.
Map
Geo Mapping of the Members
- Enable 'Allow to Post My Location' in 'Settings' tab.
Useful functions
Message Viewing and Sending with specified Member
- Tap member's icon on the Message list, Members list or Map tabs.
The Member will be in selected.
- The Message list appears only Messages which are related with the specified Member.
- The Map appears only the locations of the specified member.
- When you send a message in a state in which you specify a Member, the Message is registered as a special Message (Private Message) that only the specified Member can read.
- When you tap the Member icon again in a state in which the Member has been specified, specification is released.
Message Viewing and Sending with Channel
- You can specify the Channel of the Message you want to send and view in Messages list, Members list or Map tabs.
- Messages that are sent by specifying a certain channel will be appear only if you select the channel 'All' or the same channel of the message.
- If more than one topic are mixed among the Members, it makes it easier to view the flow of the topic and selectively using each Channel.
- Unlike the "Private Message", even in the Message that the Channel specified, by specifying the 'All' channel at the time of viewing, all of the members can view the Message.
Using Remote Controller
By using the remote controller, you can exchange messages without operation on the screen.
- Tap 'Action' in the Sessions list.
- Tap 'Enable Remote Controller'.
The operation on the remote controller will be enabled. The following actions are available:
- 'Play'/'Pause':
- 'Start'/'End' voice message recording
- 'Next Track':
- Play the next message of the last played message.
- 'Previous Track':
- Play the message before the last played message.
The voice message that started recording with the remote controller will be sent automatically at the same time as recording is finished.
When unintended recording starts, you can cancel recording and automatic transmission by performing "play / pause" again within 1.5 seconds. - Select the target Session from the Sessions list.
When you enable the remote controller, messages received for the target session are automatically read aloud.
Backup and Restore of Messages
- Sessions and Messages stored on your device can be backed up on your iCloud Drive.
- Data that has been backed up, in addition to the same device, you can restore any devices that your iCloud account is set in.
- "TQ Communicator" are compatible with the backup in the mutual "free version" and "paid version". When moving to the paid version from the free version, please use this functions.
Backup
- Tap 'Action' in the Sessions list.
- Tap 'Backup to iCloud'.
- If there is no problem with the contents of the dialog, tap the 'Backup'.
Restore
- Tap 'Action' in the Sessions list.
- Tap 'Restore from iCloud'.
- If there is no problem with the contents of the dialog, tap the 'Restore'.